Showing posts with label Vacuflush Vacuum Generator Rebuild. Show all posts

Friday, June 18, 2021

Getting Ready to Leave for Six Months


With my youngest son's wedding in late July in Cleveland, we have hung around HOT and HUMID Florida a bit longer than "I" like.  Tuesday I took the motorhome out of storage, got the oil changed and tires leveled out with air (except for short local drives it has sat since October), and parked in the Holiday Travel Park nearby.  In fact, it is just under a mile driving, and a half of a mile as the crow flies.  It is very convenient for cleaning and packing.  We figured we would move in on Monday, and head for DeLand to visit Marcia's brother Dean and wife Caryl on Tuesday.  Yesterday morning (like around 4 am) I told Marcia that we might want to consider moving in on Friday or Saturday night making it easier to clean the Condo and not have all our stuff split between two locations.  So Thursday we cleaned a bit more, moved the food and other things in, and planned on moving our clothes and toiletries today...BUT...


Someone (not me or Indy) had a tooth that was hurting like heck.  At 4 pm Aspen Dental said they could see Marcia at 7 pm, and today they did a deep cleaning and pulled her tooth, which previously had a root canal, where one of the roots had broken off from the tooth causing pain related to infection setting in.  Could not believe we could get all that done within 18 hours of contacting them.  Of course, could not believe the price either, but that is life...just used Uncle Joe's stimulus money for that one!

Another way we have spent our Stimulus Money was getting a new Tire Pressure Monitoring System.  Our old one was having problems the past couple of years, and after some research I decided on this GUTA System with 12 sensor caps...we only need 10, so this gives us 2 extras.  So far I like how this system is programed, and it comes with an extender antenna if needed...we probably don't need it.  The sensor caps are a bit smaller than our current ones, and none of these are pass-through, so to add air I will need to take each one off like I did with the car.  The battery on the monitor lasts for 10-14 days, with some people reporting even up to few weeks...and you don't have to have it plugged in all the time like our previous one.


Another easy fix was replacing this black tank flush intake valve.  Wish all fixes were this easy...


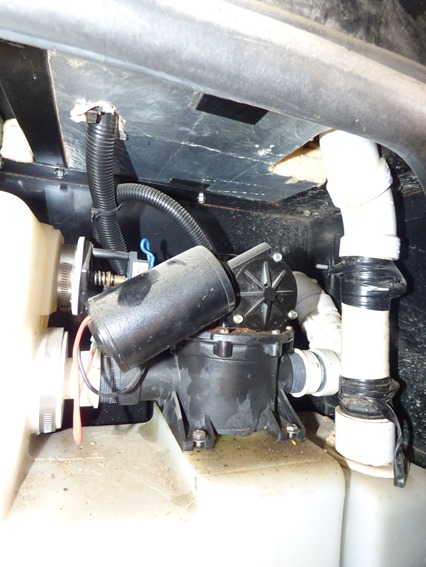
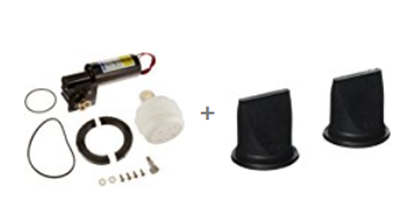
Unfortunately, it was time to replace the duckbills on our Vacuflush toilet system, and found that the bellows needed replacing too.  Of all the motorhome jobs I have done, messing (no pun intended) with this toilet system is the worse.  Thought I lined up a repair man to do it, my legs are not what they use to be and my arms are big to work in this confined area...but it ended up that the repair guys fell through, and I did get it done.  All I can say is YUCK!  (I wrote in detail about doing this job back in 2018, just click here)

Indy has enjoyed our many weekly trips over to the Doggie Park...until the weather got so hot and humid this past 10+ days.  (Highs in low 90's, Lows in upper 70's, humidity in the thousands range!)  On this day she was one of 14 dogs in the small dog park area...by the time I took this picture all but 3 dogs had left.  She has been the only dog at the park a number of times, and that just is not fun for her.

The Westminster Kennel Club Dog Show was on last weekend, and she was GLUED to the screen, sitting on my lap just to keep her from attacking the screen when they trotted around the stadium.  We were pulling for this Westie...but Wasabi the Pekingese won best of show.  Indy really enjoyed it, but we did have to take a five minute time out at first because she was just too excited by it all.

On Monday Indy gets her three year rabies vaccine shot and three year license...Tuesday we head out.


Wednesday, February 21, 2018

Final Saga of ‘Black Tank’ Vacuum Generator Rebuild – What a “OOPS” We Avoided

At home in Holiday / Tarpon Springs area

Vacuum Tank Generator Pump with Elbow

Ok, this is the last of the vacuum tank generator rebuild post…I thought I had posted the end a week ago, but there was a “TWIST” in all of this, which I just feel must be shared.

Elbow leading to Black Tank

This “elbow” had a leak right where it connected to the vacuum pump…the end not connected leads to the black tank, so looking above it was the joint attached to the pump.  As I said previously, the person at Home Depot gave me the wrong gasket.  Last week I took the elbow off, and took it to Ace Hardware, no luck finding the right gasket.  So I ordered a gasket from Amazon…but it was too small also.  So I took the entire elbow to Home Depot (last time I only took the old gasket to Home Depot), and I ended up getting a beveled Slip Joint Washers and nutslip joint washer (pictured right).  Of all the gaskets I looked at and purchased…and I lost track of how many types I looked at, let alone purchased, this gasket seemed to be the best prospect...fairly tight fit, and looked to me like it would work.  NORMALLY a slip joint washer goes on the pipe that the sticks out of the locking nut…but that is not how this setup works.  The nut attaches to a threaded pipe, and there is no way to get to the white pipe that comes out the other end of the nut….all of that is glued in place as part of the elbow. Had there been easier access, I would have tried various gaskets which I purchased...but I wanted to put it back together just one more time and not many times, hence the long search for the right gasket.

Getting the elbow out was an easy task…putting it back in was much harder than I expected.  When I put it on last time, I already had attached it to the pump, as shown in the first picture.  I really did not want to have to take the pump back out…but yesterday (Tuesday) I lost both of the washers trying to reach into that crowded area and attach the elbow to the pump and to the line to the black tank.  GRRRRR!   Today I bought three packages of washers, two per pack.  But I had the CRAZY idea of trying to see if I could attach the elbow without a washer as a test just to see if it was possible.  As I do this, the elbow slips out of my hand, and back behind the entire vacuum pump generator tank with NO WAY to get to it without taking off the vacuum pump.  DOUBLE GRRRRRR!  (But mom, you would be proud of me…all I said was CRAP….that means I just have to lick the soap and not take a big bite of it had I said the “S” word!)

Vacuum Generator Pump sitting on and attached to the tank

The above picture I showed in a previous blog….to remove you undo the bolts shown by white arrows (and loosen the ones behind it in corresponding positions), then undo the white nuts shown by red arrows (the one on right is the elbow which is now behind the entire motor and tank).  DuckbillDoing this, I was then able to move the motor toward me just a few inches, turn, and provide enough room to get to the elbow.  As I do this, I look at opening of the dark pipe created where the left arrow is and what do I see???  To my HORROR, I see that the duckbill (pictured right) is facing the wrong way!!!!  Oh my goodness….there is NO WAY any solids would be able to pass through a duckbill which is facing the wrong way!  HOLY CRAP!  (Yes mom, I know that deserves a bite of soap…thank goodness they did not have Tide Pods when I was a kid!

Thank goodness I dropped that elbow back behind the tank…we would have been up to our necks in poop before we got to California, that’s for sure.  It was easy to put the duckbill in the right way, and I double checked the other three duckbills, which were all facing the right way.  I attached the elbow to the pump motor assembly, and I put the motor back, attached all the pipes, reconnected an electrical wire that came loose as I tightened everything, and I am happy to say that all is working.  Turn on the switch, the green light comes on within 30-45 seconds, you flush, the green light comes on again in 30-45 seconds, you turn off the switch.  Also, no leaks!  Job is finally done.  We should be good for another few years now….four weeks from tonight and we should be on the road again.

(If you missed my work on rebuilding the Vacuum Generator Pump, see these blog postings….A 'Dirty' Job but Someone Has to Do It;  Up to my Neck in …; and Dirty Deed is Done, AND IT WAS … ) 

Friday, February 16, 2018

Flowers Surprise ‘Again’

At home in Holiday / Tarpon Springs area

Marcia's Valentine Flowers

Every year, this being the 8th Valentines Day that we have known each other, I have surprised Marcia with flowers…although one year we were out-of-town so the surprise happened a few days later on our anniversary.  I had the flowers delivered on the 13th, 1-800-Flowers again.  It was perfect…Marcia took her afternoon nap around 3 pm, the flowers came around 4 pm, when she came out she saw the ‘box’ and nearly fainted again.  Earlier she said, “WOW, it's nearly Valentines Day!”  I said, “Oh, that one snuck up on both of us this time….”, and just went about my business.  It worked…she had no clue that I knew it was Valentines day...I had ordered her flowers 10 days earlier.  😀

Marcia's Valentine Flowers

The next day the flowers always look better…as she says, “Hey, I just got up, you have no business taking my picture!”  Hey, it’s Valentines Day, pictures are in order!

Marcia's Valentine Flowers (Skruffy is jealous)

Can you see it in Skruffy's eyes?    “Hey, mom got flowers, don’t I get anything?????”

Of course, the day was soured by the senseless shooting down in southern Florida.  Our hearts go out to those who lost love ones, prayers for those who are still fighting for their life. 

Union Washer

Went by the motorhome today, took out the elbow running from the Vacuum Generator towards the Black Tank.  (If you missed my work on rebuilding the Vacuum Generator Pump, see these blog postings….A 'Dirty' Job but Someone Has to Do It;  Up to my Neck in …; and Dirty Deed is Done, AND IT WAS … ) Took it over to the ACE Hardware, and to my disappointment, they did not have the right gasket.  They did have an “O-Ring”, which was the right size, but not really what I needed.  I bought it anyway, 85 cents, just in case.  Went over to another ACE Hardware, and they had the same collection as the first ACE Hardware…but I decided to try a slip joint washer…it was only 59 cents, and it was 1/4 inch too small.  I got to thinking about it, I decided to go back home, get on the Internet, and try and find what I really needed.  Did some research, found what to search for, and found that Amazon has what I need, it is called a “Union Washer”, and it looks just like the one I took out a few weeks ago when I did the original work.  It measures 1-1/8 inches on the inner diameter, and 1-5/8 inches on the outer diameter…perfect!  Should be in on Monday or Tuesday, and then we will be in business. 

MRI

Marcia had her first visit with her new Neurologist, and we came away from that appointment feeling like we had really scored.  We both really like this Neurologist, and he suggested that we have another set of MRI tests done, along with some X-Rays, and some tests in his office “just to get a snap-shot” of how she is doing.  Results of the MRI and X-Rays are in, and he said that her MS has not progressed and all he saw in her neck was a bit of arthritis.  The office test are next week, and then she just has her mammogram in early March followed by another meeting with the Neurologist for a short “results of your test” meeting, and we are done for the year...then we start packing up the motorhome, and we plan to leave on Wednesday, March21st after church.

Thursday, February 1, 2018

Dirty Deed is Done, AND IT WAS …

At home in Holiday/Tarpon Springs area

Finished Pump Assembly rebuild

Well, there is the rebuilt Vacuum Generator Motor Assembly.  It was a dirty job…but not as “BAD” as I had anticipated (smell and fluid wise), but it was difficult due to the tight squeeze (lack of space to work in) and the heavy calcium build up (yuck!).  After getting it apart, I had difficulty getting the main bolt off which connects the motor and the billow.  I had to buy those two tools on the table above…seems like every RV job adds to my tool collection (unless it is done at Arny’s because he has 3 of EVERYTHING!)  And yes Arny, that  is a 3/4 open end on one side, and closed ratchet on the other.  Hot smile  Once home, I had it all apart lickety-split.

YUCK!The picture to the left is purposefully small…but if you click on it it is larger, but why anyone would want to do that is beyond me.  The only reason I included it was to show the brown calcium build-up that I had to deal with.  There are FOUR duck bills, and they were AWFUL!  I don’t know how anything was passing through the old duckbills…and they were all hard to pull out due to the calcium build up around them.  DuckbillIt took a lot of lime-away type of cleaner to get the calcium out of the cylinder chamber and out of the pipe areas. I also found that to replace the duck bills in the future, I will have to remove the entire Motor Assembly (all that in the first picture)..but I won’t have to take the motor assembly apart, just remove it….this is probably why the duck bills have not been done for who knows how long.)


Pump Assembly, back side showing billows

Here is the other side of the assembly, and you can see the billows, and that large bolt holding it to the motor.  When you try to turn the bolt to take it off, the whole motor turns…which is why I needed that clamp thingy to hold the shaft on the other side of the billow....which worked, the bolt loosened right up.  As this motor turns, the billow goes up and down.  Up brings fluid (and solids) from the vacuum tank…solids are broken up as they pass through the duckbills, and as the motor pushes the billows down, it pushes the mixture through to the black tank.  The duckbills will close on the intake side as the billows goes down, and on the exit side as the billows come up, hence, allowing the mixture to move only in one direction.  After a minute or two, it builds up a vacuum in the vacuum tank…and when you flush, a lot of mixture pushes right through the cylinder chamber to the black tank, the rest of it is pumped as the billows go up and down.

Scratches on arm from working in confinded space

All of these pictures were taken with my cell phone, except the duck bill (above) and the picture below, both of which I got off the Internet.  Above is my arm…the hazards of working in a very tight space.  This was before re-installing it, and it even looks worse now.  Amazingly, the right arm hardly has a scratch. 

Vacuum Pump Rebuild Parts

TWO ISSUES:  I showed the picture above, less the arrow, in a previous blog.  When I put the  motor assembly back together again, I did not get these clamps (red arrow) on correctly.  The beveled end actually faces down, not up.  When they are up, the billows will “seem” to be set correctly, but as soon as you move the motor and add compression, the billow will pop down, hitting the bottom of the cylinder.  The directions are vague on this, and I should have researched the Internet again right before I put those on.  But THANK GOODNESS I tested it before I put it back into the RV, and it was not that hard to take apart and put them in the right way…which holds the billows in place.  WOW, this new motor and billows are much quieter than the old ones.

The second issue is that I have a leak.  When I was at HomeDepot, the person in plumbing gave me the wrong washer for that white pipe shown in the first picture.  So tomorrow (or one of these days when I can bend over and reach into that small compartment) I will need to take the white pipe off, get it over to a nearby Ace Hardware, and get the right washer.  Not looking forward to that…but it needs to be done.

One GOOF:  As I was trying to unloosen the back left bolt holding the assembly in place on the vacuum tank...I dropped the wrench...which went down to the back side of the vacuum tank.  It was easy to get to once I had the pump assembly pulled out, and thank goodness I was able to use a ratchet on the other back bolt...but the ratchet would not work on this once due to the confined space.  By chance, I tried to turn the bolt with my bare hand...and it turned.  I think this is what messed up my left arm so much....

Wednesday, January 31, 2018

Up to my Neck in …

Home in Holiday / Tarpon Springs area

Called my brother-in-law Arny today and the first thing I said was, “ARNY, I am up to my neck in ….”  He goes, “OH NO!!!”  I laughed and said, “Not really…the parts just came in today, will be doing the ‘dirty deed’ over the next few days.”  (Referring to my last blog about fixing the motorhome toilet system)   He got a good laugh out of that.

Bubba in his Chair, taken last DecemberArny said Bubba is doing great.  Although he is now in the habit of getting up at 4:30 am every morning because that is when my sister Sandy gets up then.  Every day means Saturday and Sundays too…and if you don’t get up to let him out, he will barf…he has never peed or pooped in a house, but he will barf.  He gave Arny a bit of a scare the other day.  Arny went to the sliding glass door to let Bubba in, and as he opens to door to call out to him, he can’t see him.  He even took a flashlight out and looked all over for him, but to no avail.  He comes back inside and there is Bubba asleep in ‘his’ chair.  Arny figures that when he opened the door, Bubba was over at the water bowl, slipped into the house without Arny seeing him.  Got Arny’s heart a racing, that’s for sure.

Michael & Anna's new houseTalked to my Son Michael and he and Anna’s house purchase went through, and they will be moving in early in February.  It looks like a real cute home, real close to a community park, and in a real nice neighborhood about 4 miles from where they both work.  It is AMAZING how quickly house prices have sky-rocketed in the Sacramento area…and they are wise to buy now because a year from now the interest rates will be higher and the prices will be higher too.


Mr. Steak

Back in November while we were still in Sacramento, I wrote a blog about my “Mr. Steak Years”, from busboy/dishwasher to cook, to head cook, to Assistant Manager to Manger to General Manager….worked nearly 15 years in that business.  Well, the other day I got an email alert that someone posted a comment, which being that late from the posting is normally spam…but this time it wasn’t…it was one of my Mr. Steak employees.  I share it with you here…
hi dave -- my first job at 15 1/2 years old was as dishwasher at mr steak on fair oaks. my dad harry and I ate there before I worked there and I think he convinced you to give me a shot. great memories, great work experience, made some good friends and I wound up owning 2 restaurants myself, one in SF one in southern CA , still going strong. anyway looks like life has treated you well. thanks for hiring me back then in '82!! levon kazarian
WOW!!!  You don’t know how good that made me feel…to hire a young man, and he did so good, that he made Restaurants his career!  Sure makes you heart feel good…

Vacuflush Vacuum Generator PartsI don’t think I will be taking pictures of the toilet repair, afraid to get the camera dirty…but I will let you all know how it all turns out.  Went to the local Salvation Army (the same one that was in the National News because the couple in charge was selling furniture to a local used furniture shop at a very low, sometime free, price and getting kickbacks from them.)  Anyway, I wanted a blanket and a couple of towels that I can use and toss out after this repair is done…just in case I really am up to my neck in….    Wish me luck!

Saturday, January 27, 2018

A 'Dirty' Job but Someone Has to Do It.

Home in Holiday – Tarpon Springs area

Our Vacuflush Vacuum Generator System

Unlike most motorhomes, our Black Tank system has what they call a Vacuflush Vacuum Generator System to push the toilet flushes over to the black tank.  Above is a picture of it as it sits inside a small outside compartment of our motorhome.  These are common on boats, less common on RVs.  Ours looks to have easier access than most boats do, so that is a plus.  When we bought this motorhome, I “KNEW” that some day I would have to work on this.  The duckbills (shown in a picture down below) are suppose to be replaced every few years…I don’t know if ours have ever been replaced.

A Vacuflush Vacuum System

Found this nicer picture of a similar one to ours with labels and diagram showing how it works.

Pump and Billows assembly

Above is the pump assembly…I need to replace the motor and billows.

Parts to fix it...motor, billows, gaskets, duckbills

These are the parts which I need to replace.  The motor and billows (white plastic thing) are different than what I have in ours … it is a new, upgrade version and the only way to replace it.  The motor now sits horizontal, and not at a slight angle like ours does.  The motor can sit to the right or to the left … the one in the picture up above lays to the right…I am not sure which way I am going to do ours.  The good news, this upgrade is suppose to be much quieter.  Those enlarged black things are called the duckbills.

Close up of our motor assembly

It should be as easy as this…..
  • Disconnect the wires from the motor…they have clips and this should be easy
  • Disconnect the four bolts, two shown by the white arrows, and two back behind it.  Getting to these back bolts will be a bit hard due to lack of room to work, but I am hoping they will unloosen without problems
  • Disconnect the entry and exit pipes, marked by red arrow…this is what I am not looking forward to…don’t know if there is fluid in these or not.  It could get messy… This is where the duckbills are located.

Parts Diagram

Above is a diagram of the assembly.  The only difference is that I am only suppose to have two of the number 12 part, they are called duckbills…however, I have four to replace with “if” there are four.  Once I get the pump assembly out, taking it apart and putting in the new parts should be fairly easy.  Thank goodness the RV Storage has wash stations to clean your RV…I have a feeling that once I get the assembly out, I will need to take the RV over and wash out that compartment, and definitely wash down the pump assembly before I take it apart.  And yes, I do have a new pair of gloves to use.  The parts should be in by Friday of next week…so I have another week to “dream” about this wonderful project…and how wonderful the smell will be…  I don't know smile